Homelab / Game Servers
Proxmox
Start by downloading Proxmox VE here: https://www.proxmox.com/en/downloads
Burn it to a flash drive, and complete the normal installation process.
During the installation, it will ask to set a static IP.
Set one on the same subnet as the systems that will be accessing it.
Once installed, you can access the web interface at:
Log into the web interface as root with the password created during installation.
On the left panel, navigate to Repositories, select the ones labeled "enterprise" and click disable.
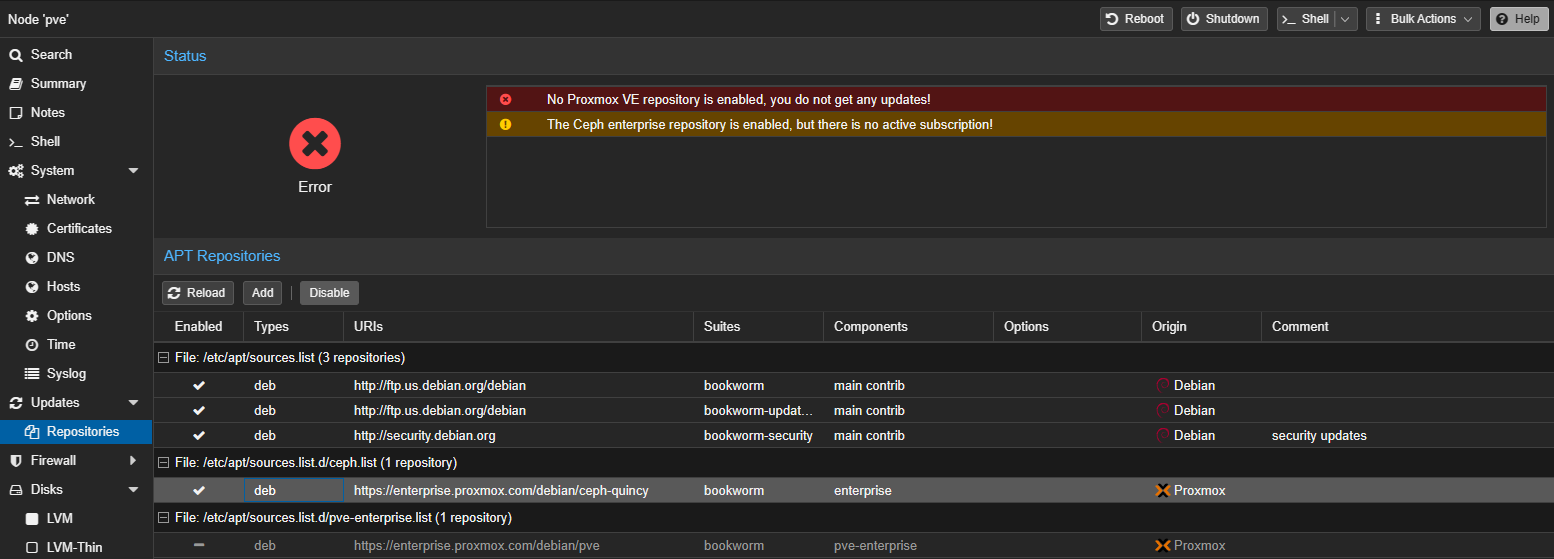
PCIe Passthrough for GPU's / Network Adapters etc.
Next, from the left panel click on "Shell" for the pve host and edit your grub configuration to allow PCIe passthrough / IOMMU.
Open up grub's config file with:
- nano /etc/default/grub
Find the line:
GRUB_CMDLINE_LINUX_DEFAULT="quiet" and add intel_iommu=on iommu=pt at the end of the line so it looks like this: - GRUB_CMDLINE_LINUX_DEFAULT="quiet intel_iommu=on iommu=pt"
Press Ctrl+O to save, then Ctrl+X to exit.
Update grub and reboot after it completes.
- update-grub && reboot


Adding ISO Images
On the far left pane, click on your local (pve) volume, and in the right panel select ISO Images, and click Download from URL.
Paste in a direct download link to the ISO of your choosing. At the time of this writing this example uses Ubuntu Server 22.04 LTS which can be found here:
Ubuntu Server

Click Query URL, and hit the Download button.
Virtual Machines
On the top right of the web interface, click Create VM
Enter a name for your VM, and click next.
In the OS tab, click ISO image and select your OS from the dropdown menu, click next.
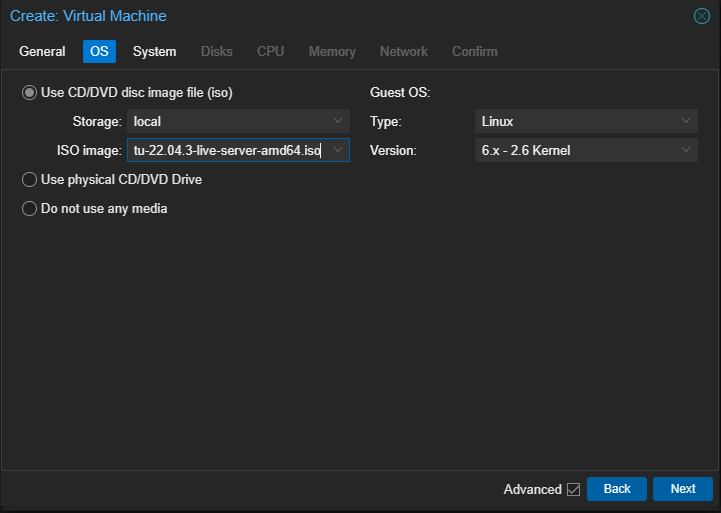
In the system tab, change the BIOS to OVMF (UEFI), ensure that "Add EFI Disk" is checked.
Set EFI storage to the volume of your choice.
Check the box to enable the Qemu Agent, click next.

In the Disks tab, change the Bus/Device to SATA, and change the storage to the desired volume. Click next.
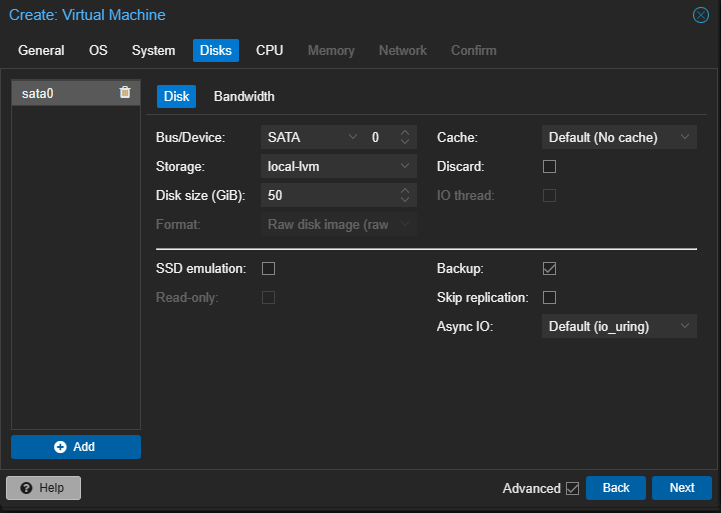
In the CPU tab, set your cores, and change the Type to host and click next.
(not necessary but can give you more performance, using physical core rather than threads)

In the memory tab, set your desired amount of memory and click next.
This setting is in Mebibytes, use a calculator to convert from Gigabytes.

In the confirm tab, check the box to start the VM after it's created and click next.

PCI Passthrough
If you want to pass a GPU or other PCI card through to your VM, shut down the VM.
Edit the VM's hardware options to change the machine type to q35
Navitage to the hardware tab, Click Add --> PCI Device
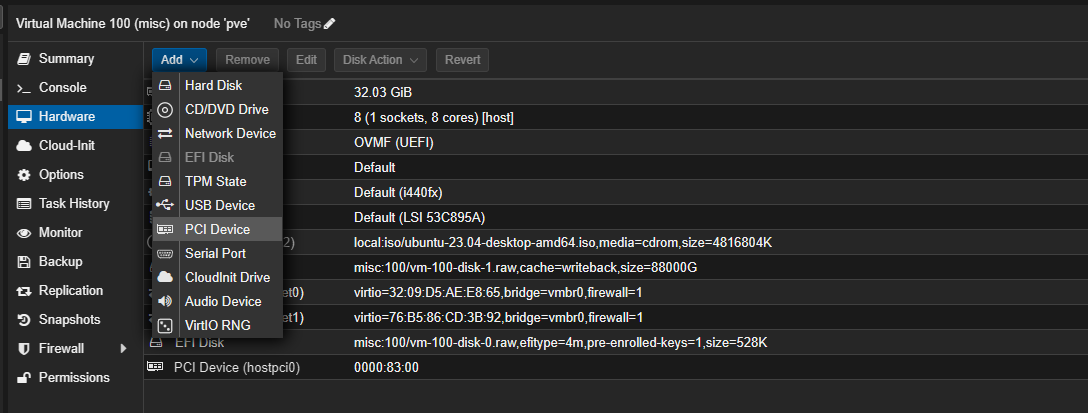
Select Raw Device, and select your device from the dropdown menu.
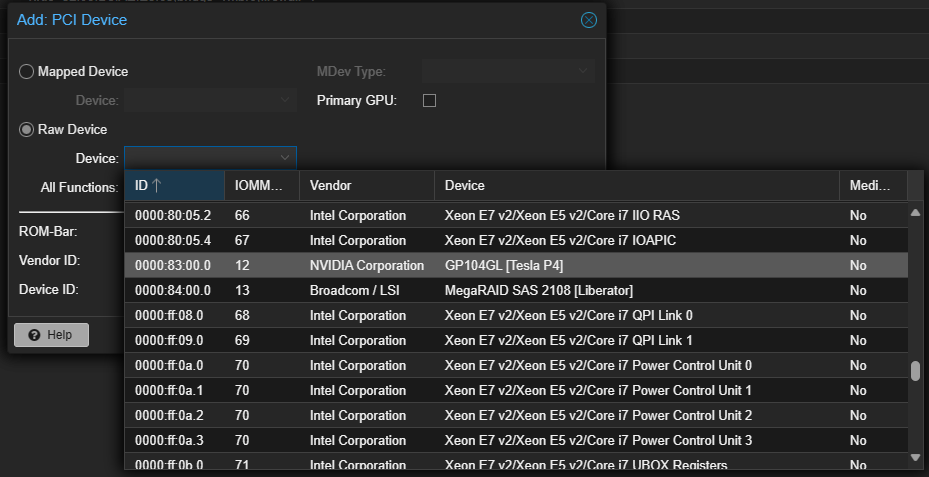
Leave the Primary GPU box unchecked, click Add.
You will need to install the drivers for your video card or other PCI device in your VM.
Ubuntu Installation
Click on the left pane for your VM, and click on Console, and proceed with a normal Ubuntu installation.
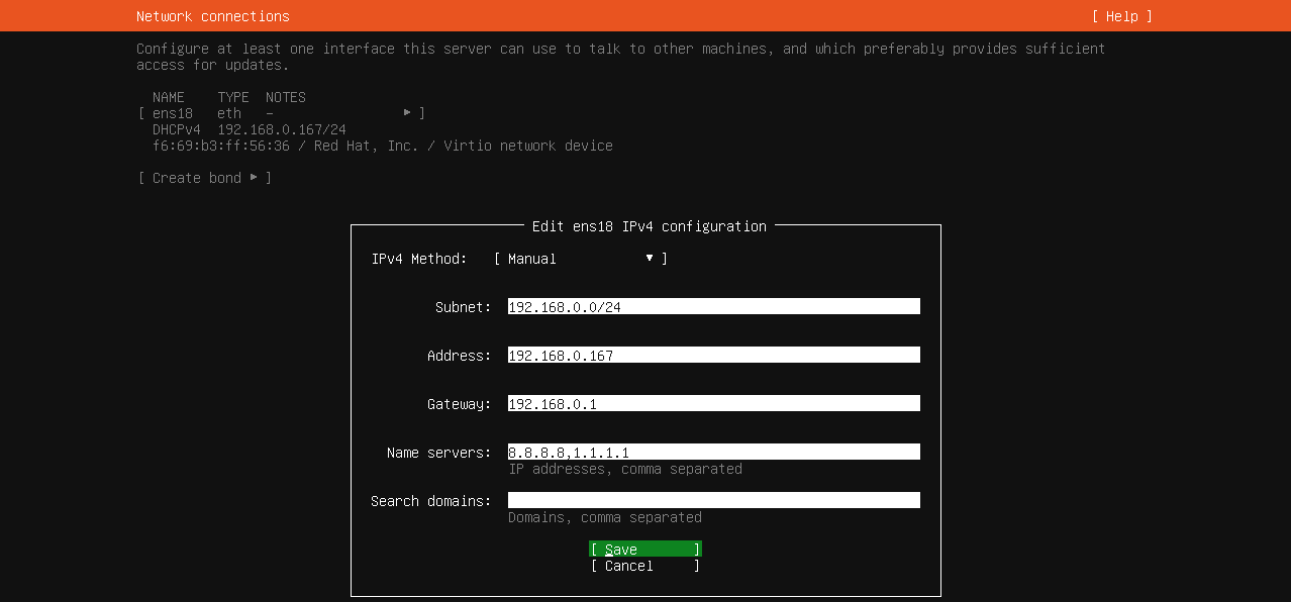
When you get to the networking setup, click the interface and select Edit IPv4, and set it to static.

Set your subnet, static IP address, gateway and DNS.
For example 192.168.0.0/24, or 192.168.1.0/24, 10.0.1.0/24, etc.
When you get to storage, you can leave the settings as default, but I like to uncheck "Set up this disk as an LVM group."
The reason for this is that it basically creates a second partition for your home directory
which can cause problems later if you don't have enough space to add packages to your root directory.

Continue with the rest of your Ubuntu installation, check the box to install OpenSSH server.

Once you're booted into the system and logged in, run updates:
- sudo apt-get update && sudo apt-get upgrade -y
Install net-tools for ifconfig and other useful tools:
- sudo apt-get install net-tools -y
At this point, your Ubuntu installation is complete and it's easiest to ssh into the system to continue.
Ubuntu Firewall
By default, Ubuntu's firewall is disabled.
Before enabling it, create a rule that allows you to maintain your ssh connection:

Enable the firewall:

Verify the firewall is enabled:

Restart the firewall service

Your firewall is active and running, We'll open the ports for our game servers or other services later.
Docker
To install docker, first run updates:
Then run the following commands:


Compose
Now that docker is installed, we need to install the Compose plugin:
- mkdir -p ~/.docker/cli-plugins/

- curl -SL https://github.com/docker/compose/releases/download/v2.3.3/docker-compose-linux-x86_64 -o ~/.docker/cli-plugins/docker-compose

- chmod +x ~/.docker/cli-plugins/docker-compose

To verify that the installation was successful, run:
- docker compose version

Palworld
The docker container for a palworld dedicated server can be found here:
thijsvanloef on Github
Navigate to your home directory:

Clone into the github repository (download the image):

Navigate into the palworld-server-docker directory, and edit the docker-compose.yml file.
Change the SERVER_PASSWORD, ADMIN_PASSWORD, SERVER_NAME, and SERVER_DESCRIPTION variables, and set COMMUNITY=True
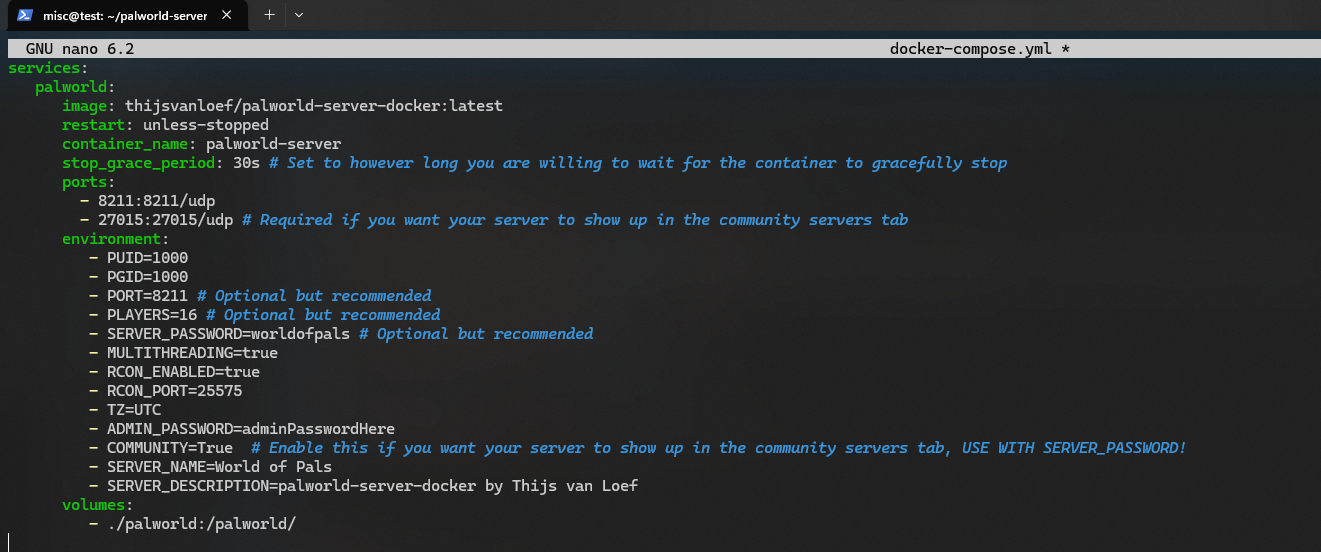
Take note of the ports, as these will need to be opened in the firewall, and port forwarded from your router.
Ports: 8211, 27015
Press Ctrl+O to save, and Ctrl+X to exit.
Create the firewall rules:
- sudo ufw allow 8211/udp
- sudo ufw allow 27015/udp

Restart the firewall:
- sudo service ufw restart

Forward the ports from your router.
Start the container:
- sudo docker compose up -d

Once the container is started, you can check that it is still running with by listing all containers:
- sudo docker ps -a

The configuration settings are located in:
- ~/palworld-server-docker/palword/Pal/Saved/Config/LinuxServer/PalworldSettings.ini
The world saves are located in:
- ~/palworld-server-docker/palword/Pal/Saved/SaveGames/0/
The container must be stopped before making any changes to the game or configuration files:
- sudo docker stop CONTAINER_ID (replace with your container ID)
To stop all containers:
- sudo docker compose stop
Your Palworld server should be up and running and show up in the community list, or you can use the workaround to connect via your public IP.
Crontab - Restart Server Script
To get the container ID, run:
- sudo docker ps -a
Create a new file named restart.sh:
- nano restart.sh

Add the following line but replace the random numbers and letters with your own container ID.
- sudo docker restart d4579a2e307c

Press Ctrl+O and Ctrl+X to save and exit.
Make the script executable:
- chmod +x restart.sh
Run the following command, at the prompt, just press 1 to pick nano as your editor:
- crontab -e

Add the following line at the bottom of the file, be sure to use your own username/path to the restart script:
- 0 0 * * * /home/username/palworld-server-docker/restart.sh
Press Ctrl+O and Ctrl+X to save and exit.
Enshrouded
Enable the firewall using the instructions above.
Create the following firewall rules and be sure to forward the ports from your router.
Install docker and docker compose using the instructions above.
Jsknnr's Enshrouded Docker Container
After pulling the image, change the tag in the docker-compose file to proton:latest
In the Container directory:
Edit the environment variables for your server name, password, etc.
Valheim
lloesche's Valheim Docker Container
Enable the firewall using the instructions above.
Install docker and docker compose using the instructions above.
Create the following firewall rules and be sure to forward the ports from your router.
Edit the environment variables for your server name and password etc.
Note: If connecting from a steam deck or other linux distro, use the windows/proton version of Valheim. The native linux client has issues connecting to dedicated servers.
World of Warcraft - Wrath Of The Lich King
Server Setup
Enable the firewall using the instructions above.
Create the following firewall rules and be sure to forward the ports from your router.
Install docker and docker compose using the instructions above.
Clone into the AzerothCore git repo:
Navigate into the main directory:
Build the container and bring it online, this can take ~20 minutes:
After the authserver and worldserver containers are started, bring them back down to configure them.
Navigate into the config directory:
In the authserver.conf and authserver.conf.dist files..
Find the line below and change from 127.0.0.1 to the public IP of the server.
In the worldserver.conf and worldserver.conf.dist files..
Find the lines below and change from 127.0.0.1 to the public IP of the server.
Bring the containers back online:
It make take a bit, but after the containers are all started, you'll need to make a user account in the mysql database.
Start by accessing the the worldserver console:
Run the following command but replace user and password with the username and password for the account:
To detach, press ctrl+p and ctrl+q
Do not try to detach using ctrl+c or you will kill your worldserver process.
Install the mysql client:
Log in to the database. The default database password is password
Update your realm name and list.
Client Setup
You'll need a WOTLK 3.35a client.
I got mine here, which is portable and does not require installation:
https://www.ironforges.com/downloads
Use at your own risk. Feel free to rename the folder and client.exe
Once downloaded, extract the zip file and navigate into the WTF folder.
Edit the config file, and change the IP address in line 16 to your server's public IP address:
For additional information, refer to this guide:
https://www.azerothcore.org/wiki/install-with-docker
I had one quirk where I had to toggle off the setting to enable sound in order to get sound effects.
Feel free to disable the addons as well if you like.
Clonezilla - Unattended backup and restore to USB
Download clonezilla here.
Make sure amd64 and zip are selected.

Plug in your USB drive, and open up your file explorer, and go to "This PC"
Right click your USB drive, click format, and make sure FAT32 is set for the File system. Press OK.

Extract your clonezilla file you downloaded, open up the folder, and copy all the contents to the USB drive.

Click this link, and hit Control+S to save it to your computer, name it grub.cfg
On your USB drive, go into the boot -> grub folder, and rename grub.cfg to grub.cfg.old
Copy the new one you just downloaded and place it into this folder.

Now we need to make sure the right drive will get copied.
Turn off your computer, open up the side of your chassis, and unplug one of your hard drives.
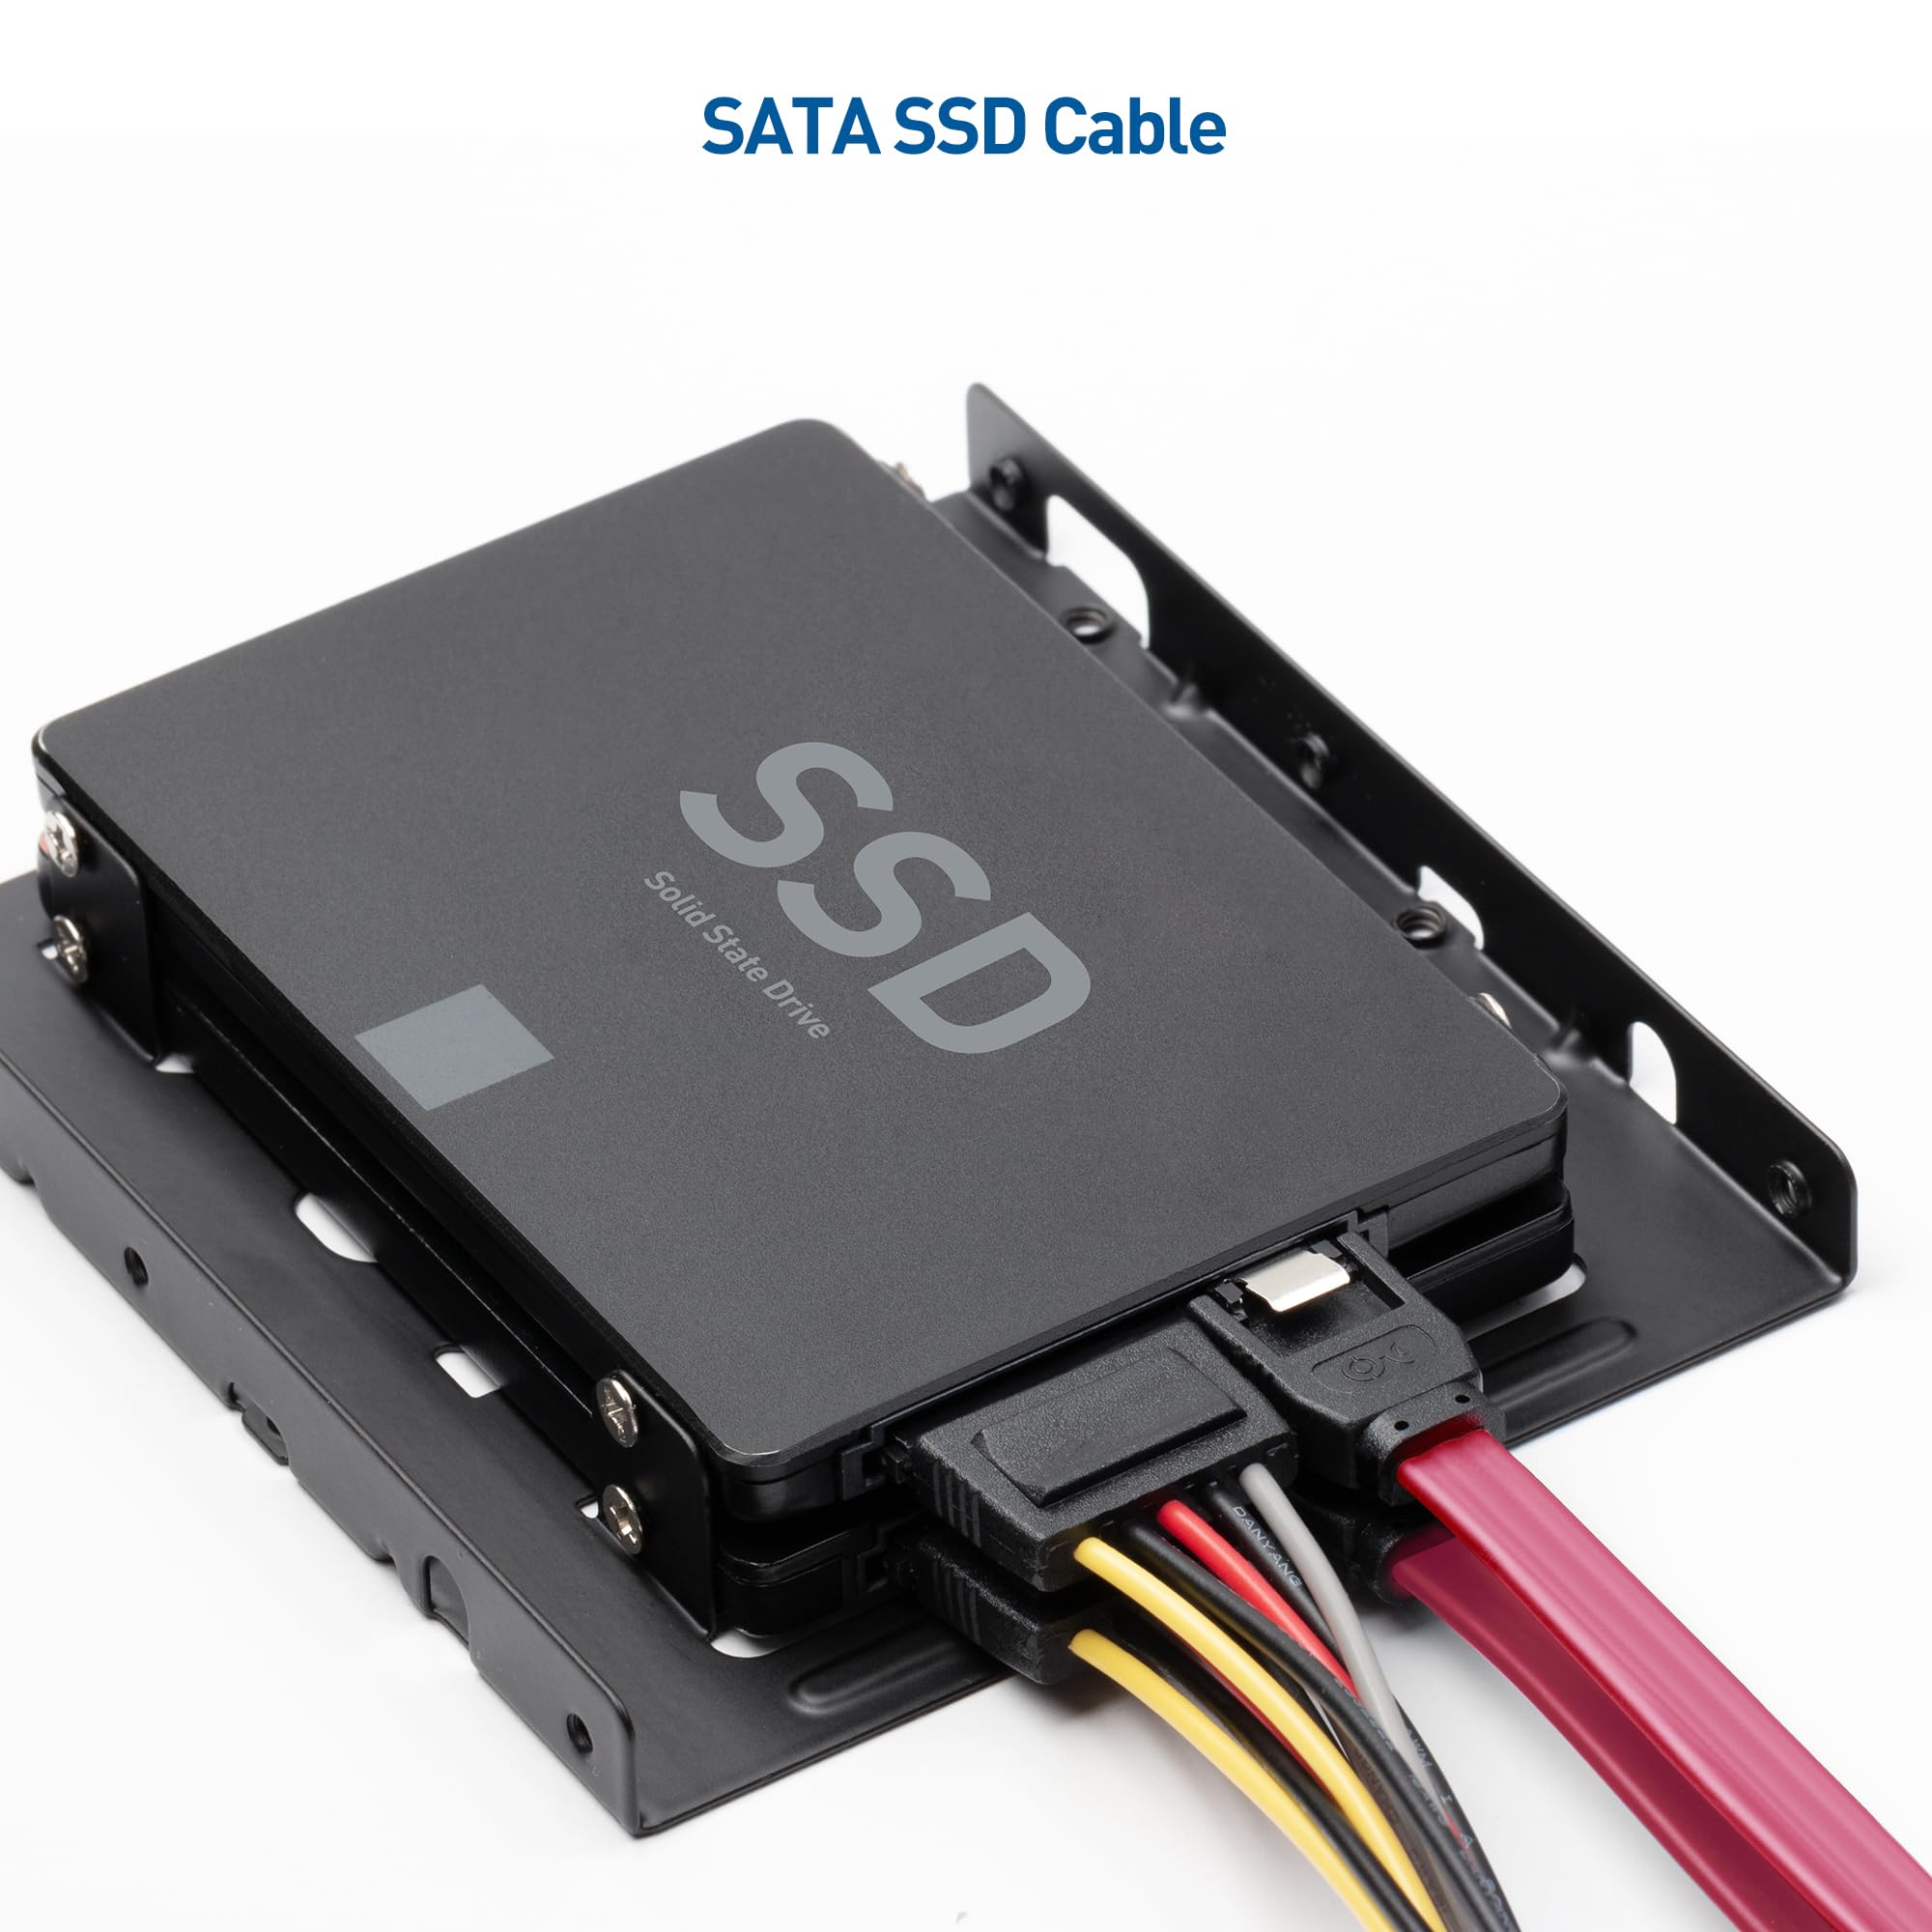
Each drive will have two cables, you only need to unplug one of the cables for the drive.
In this picture, the cables on the left go to the power supply, the right ones go to the motherboard.
Try turning on your system and see if it boots into Windows. If it does, then you got the right drive.
If it doesn't, you'll need to plug this drive back in, and unplug the other one.
You want to be able to boot into Windows, cause that's the drive you want to copy.
Make sure that your USB drive is plugged into a blue USB port if your computer has them.
In this picture, the black ports on the left are USB 2.0, the blue ones on the right are USB 3.0.

Reboot your computer again, and spam press F11 to invoke the boot menu, and select your USB drive.
It will bring you into the "Clonezilla" menu, and you should have two options:
- 1. USB - Save Image (sda -> image)
- 2. USB - Restore Image (image -> sda)
Select the first option, and it will automatically back up your C: drive to the USB drive.
At the end I don't remember if it will reboot automatically or not, or if it will prompt you what to do.
If it does prompt you, just select the button for shut down.
Unplug your computer again
Now you need to unplug your C: drive, so no hard drives are connected in your computer.
Put in your brand new drive and connect it using the same cables that were connected before.
Turn on your computer, and spam press F11 again to invoke the boot menu.
Select the USB drive, and when it boots, this time you want to select the second option:
- USB - Restore Image (image -> sda)
This will copy the data from the USB stick, to your new drive.
When it's done, shut it down again, and reboot your computer right away without making any changes to see if it boots into Windows.
If it does, great.
If it doesn't, then something went wrong and I'll need to walk you through how to do it again manually.
Make sure you have your laptop and phone handy just in case.
Once your back in Windows, click start, and type Disk Management, and select the tool that comes up.
Your C drive might look like this where it only uses 128GB, and the rest of the space is "Unallocated"
If it does, right click the left side that has the partition (not the unallocated one) and see if you can "extend volume"
It's greyed out on my system but it probably won't be on yours.

Then you're pretty much done, turn off your computer, connect your D: drive, and you're good to go.
You'll probably want to leave your C: drive disconnected, since it's so small and not really usable for much.
If you don't wipe it then it can cause windows to get confused when you boot, since you already have another drive that's exactly the same and it could boot into the wrong drive.
If it doesn't let you extend the partition, then I can walk you through fixing that too later, just let me know.